Hello Friends , in this blog
post we will understand how to configure Flume agent and will
implement it.
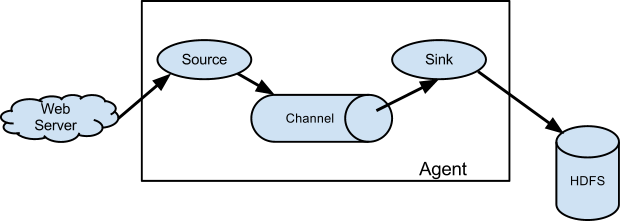
We already know that every flume
program has three important parts :-
Source
Channel
Sink

We will start configuring these
three in our configuration file.The configuration file should be
stored in a local filesystem.The configuration file can include
Source,channel and Sink.In the configuration file, the properties of
source ,channel and sink in an agent are defined and are coupled
together.
# Name the components on this agent
a1.sources = r1
a1.sinks = k1
a1.channels = c1

# Describe/configure the source
a1.sources.r1.type = netcat
a1.sources.r1.bind = localhost
a1.sources.r1.port = 44444

# Describe the sink
a1.sinks.k1.type = logger

# Use a channel which buffers events in memory
a1.channels.c1.type = memory
a1.channels.c1.capacity = 1000
a1.channels.c1.transactionCapacity = 100

# Bind the source and sink to the channel
a1.sources.r1.channels = c1
a1.sinks.k1.channel = c1
We will save the above
configuration with the filename example.conf
How
to run the Flume agent ?
Below is the basic syntax for
running the Flume agent.
$ bin/flume-ng agent -n $agent_name -c conf -f conf/flume-conf.properties.template
We will run our example with the
below command :
$ bin/flume-ng agent --conf conf --conf-file example.conf --name a1 -Dflume.root.logger=INFO,console
In
a separate terminal , we will write the below command :
$ telnet localhost 44444
Trying 127.0.0.1...
Connected to localhost.localdomain (127.0.0.1).
Escape character is '^]'.
Hello world! <ENTER>
OK
Again switch back to the
original Flume screen
INFO source.NetcatSource: Source starting
INFO source.NetcatSource: Created serverSocket:sun.nio.ch.ServerSocketChannelImpl[/127.0.0.1:44444] 15:32:34 INFO sink.LoggerSink: Event: { headers:{} body: 48 65 6C 6C 6F 20 77 6F 72 6C 64 21 0D          Hello world!. }
This completes our first Flume
configuration and our program with telnet.


No comments:
Post a Comment